crop: in detail
source: http://www.thegoldenmean.com
What Advantages Does the Crop Tool Offer?
Cropping an image by drawing a rectangular selection followed by choosing Image › Crop is simple, predictable and fast. Sometimes that’s enough. If all you need to do is trim some excess pixels from the edges, the marquee is certainly effective. As we will soon see however, the Crop Tool is only slightly fussier to work with, and offers several distinctive advantages.
Refinements at a Glance
Behold — Photoshop’s Mighty Crop Tool:
- can Mask the area to be trimmed, for a more accurate preview
- can easily be resized and reshaped as many times as needed before committing to it
- can crop and resample in one step!
- can be rotated, permitting you to crop, resize/resample and straighten in one step!
Let’s get started. Launch Photoshop, press the “c” key and enter the high–precision world of this Production Power Tool. (I suspect you may have already guessed the mnemonic device: Crop!)
The Bounding Box
 Let’s get comfortable with the basic operations before getting into the intricacies. Open an image in Photoshop, or create a new image. Press “c”, drag out a rectangle of any size or shape and release the mouse button. There is absolutely no need to be precise or even careful at this point. Right away you should notice that the crop tool’s Bounding Box displays some features which the marquee tool never did — specifically, eight “handles” or control handles, and a funny thing in the middle.
As you explore the bounding box, you will observe that
- dragging one of the four side control handles adjusts only that side
- dragging one of the four corner points adjusts the two adjoining sides simultaneously
- holding Shift while dragging a corner control handle maintains the proportion of the rectangle
- placing the mouse cursor inside the bounding box permits repositioning without resizing
You may have noticed other things too, but we’ll get there!
Interface Variations
Functionally, the crop tool in versions of Photoshop prior to version 6 is nearly identical to the crop tool in version 6/7. However, the floating Options palette of version 5 (and earlier) has been replaced with the options bar at the screen top in 6/7. I’ll show you the difference once here, and then use version 7 for the rest of the screen captures. I assume that any 5.x users will know to look to the options palette for most of what I am about to demonstrate.
![]() Here we see the Options Bar from the Photoshop 7 interface.
Here we see the Options Bar from the Photoshop 7 interface.
Note the current absence of any parameters for height, width or resolution.
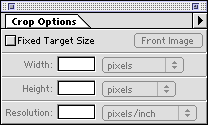 Here is the Photoshop 5 floating Options palette, with the Crop tool active. Unless otherwise noted, users of earlier versions can enjoy the same functionality, but you will need to look to the Options palette to input parameters.
Diving Into Options
If we use the crop tool without defining any parameters, its behavior is very similar to that of the marquee tool, with the exception of the ability to resize and rotate (more on that later). Draw out the bounding box; adjust size, shape and position; accept the crop by double clicking inside the bounding box or by pressing “return” or “enter”. (My preference is the return key, since I have too often moved the box while double clicking, but either technique works. Yes, you can click the accept or abort symbols at the far right of the Options strip in versions 6 and 7, but that’s wasted wrist movement as far as I am concerned!) The result will be what had been inside the bounding box, maintaining the original image’s resolution.
![]() Before moving on, let me call your attention to a cool thing that happens with version 6 and 7 (these features are not available to version 5 users.). When you initially select the crop tool, the options bar appears as shown in the preceeding section, permitting you to input height, width and resolution. The moment you start to drag out the bounding box the interface changes to that shown here, allowing you to enter three additional parameters: Cropped Area (dimmed if you have a single layer file or the background layer is active) which allows you to actually crop the file or hide layer information in the form of “big data” —see below for more information; Shield Color, which can apply a mask of variable color and opacity to help you previsualize what the crop will end up looking like; and Perspective.
Before moving on, let me call your attention to a cool thing that happens with version 6 and 7 (these features are not available to version 5 users.). When you initially select the crop tool, the options bar appears as shown in the preceeding section, permitting you to input height, width and resolution. The moment you start to drag out the bounding box the interface changes to that shown here, allowing you to enter three additional parameters: Cropped Area (dimmed if you have a single layer file or the background layer is active) which allows you to actually crop the file or hide layer information in the form of “big data” —see below for more information; Shield Color, which can apply a mask of variable color and opacity to help you previsualize what the crop will end up looking like; and Perspective.
Manipulating image geometry falls out of the scope of this tutorial. Let me just briefly mention that when the Perspective checkbox is selected, you will now find that dragging any of the four corner control handles will draw a non–perpendicular line to the adjoining corner handles. This is heaven for those of us that do copy photography of art work. If the camera is not absolutely centered on and perpendicular to the artwork, the four sides will not be square in the resulting photograph (perspective of this sort can be very effective and desirable in a landscape photo, but highly undesirable in a copy photo). Using the Crop tool in Perspective mode can straighten things out by fixing minor geometric problems instantly. What a joy! You must try this one out to fully appreciate its potential.
“Big Data”: as mentioned above, the radio buttons for “Cropped Area” are dimmed when working on a single layer file. If the “Delete” option is selected, crop does just that — it eliminates completely the image data outside the crop bounding box, and trims the file’s canvas to the area delimited by the bounding box. If your file has one or more layers however, you will find a unique opportunity, because something very different happens when the “Hide” option is selected. Photoshop still fits the canvas to the area delimited by the bounding box, but it does not trim the layer data. The layer data effectively extends beyond the canvas, and can be dragged around with the move tool. Let me express it another way. Let’s say your original file contains two layers and is 8 x 10 inches. With layer two selected, drag a roughly 4 x 5 bounding box and select the “Hide” option. When you accept the crop the canvas shrinks to 4 x 5 dimension as expected. However, all of the original 8 x 10 image data from layer two is still there! You can drag it into a new position within the smaller 4 x 5 canvas area. (Note that the background layer does get trimmed regardless of the “Cropped Area” settings.)
You can keep this big data as long as it stays in a layered .psd file. You lose the big data soon as you flatten the layers, or save–as in a file format that does not support layers (which is almost every format except .psd). Is this feature useful? It depends on your circumstances of course, but it’s just one more example of how Adobe’s software engineers have built in another safety net, another opportunity to finesse your work at a later date and yes — another defense against indecisive clients!
![]() The rest of this tutorial assumes that the “Cropped Area” is set to delete. Let me call particular attention to the “Shield Color” which I have come to appreciate as an extremely useful feature. If you find this feature to be annoying or distracting, feel free to disable it by un–checking the box.
The rest of this tutorial assumes that the “Cropped Area” is set to delete. Let me call particular attention to the “Shield Color” which I have come to appreciate as an extremely useful feature. If you find this feature to be annoying or distracting, feel free to disable it by un–checking the box.
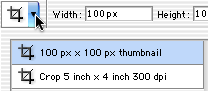 Before leaving the Options bar, let me call your attention to one final nicety (avaliable in version 7 only): the abilty to save commonly used crop settings as Presets. If your production environment involves any kind of repetitive image sizing, you will learn to appreciate this. As an example of what I mean, here is a glimpse into my own professional experience. Our shop has customers who require images sized to certain specific sizes. One likes to get 2x3x300 ppi images. Another needs 1,500 x 1,200 pixel images. Yet another needs 100 x 98 x 72 ppi images for their Web Site. And as mentioned previously, we often send 4 x 6 x 300 ppi images out for photo printing. Being able to save each of these regularly needed crops as a preset is admittedly a small deal, but stack up enough small deals and it makes a noticable improvement in the day–to–day life of a professional.
Using the Tool
I’ve spent a great deal of time on the crop tool’s options. Why? Because as you will soon see, the Crop tool permits you to do in one stroke what would have taken several steps any other way. Recall our exploration of the marquee tool from Page One. I pointed out that the Image›Crop command was very often immediately followed by the Image›Image Size command. This works, but it can be inefficient when there is a tool that will do both in one step. That tool is, you might have guessed, the crop tool.
![]() For purposes of this example, let’s say your customer or your Web designer requires an image of a fixed size. Let’s say that size happens to be 475 pixels wide by 350 pixels high at 72 pixels per inch. You have a capture from a digital camera that is 1,800 pixels wide. The marquee tool will not be much help here. Press “c” to select the crop tool, enter the parameters in the Options bar (or the Options palette for version 5, but note that the “Fixed Target Size” box must be checked), and drag out a rough bounding box.
For purposes of this example, let’s say your customer or your Web designer requires an image of a fixed size. Let’s say that size happens to be 475 pixels wide by 350 pixels high at 72 pixels per inch. You have a capture from a digital camera that is 1,800 pixels wide. The marquee tool will not be much help here. Press “c” to select the crop tool, enter the parameters in the Options bar (or the Options palette for version 5, but note that the “Fixed Target Size” box must be checked), and drag out a rough bounding box. Adjust the bounding box as much as you want by pulling at the control handles and dragging the box itself around, until you are satisfied that you have a strong, effective crop. Double click inside the bounding box or press enter/return and presto — you have an image that fits the specification exactly, in one easy step!
(By the way — if you get cold feet and opt not to crop, press the aptly named escape key!)
tiplet: Here’s an extremely cool feature. You do not need to enter information in all three parameter fields! If you don’t, Photoshop will figure it out for you. If you don’t grasp the significance of this, allow me to give yet another example from my own workflow. We have an e–commerce client for whom we supply gobs of digital product shots. Their page design is such that the images must be exactly 250 pixels wide. But the height is flexible. Some product is tall, some product is short, some are in between. The page design can accomodate that, but the width is absolutely inflexible. We set our crop tool to 250 pixels in the width field, 72 ppi in the resolution field, but leave the height field empty. Drag out a bounding box that contains the product, whatever size it is, and Photoshop calculates the missing parameter. Now that is sweet!
tiplett: I may not have been clear enough about what happens when you leave one of the parameter fields empty. I got an email from a reader who wanted to use the crop tool at a constrained aspect ratio. Specifically, he wanted to be able to crop photos to the “Golden Ratio” proportions, roughly 1:1.618. He wanted to know if the crop tool could do that. Well — yes, but it’s a two step operation. For purposes of this demonstration, let us assume you begin with a landscape image that is 8 inches tall by 10 inches wide at 300 ppi. You wish to keep the full width of the original image but end up with a cropped image that fits the Golden Ratio proportions: 10 inches wide by you don’t know how tall at 300ppi. So first set the proportions in the crop tool interface: 1.618 in. wide, 1 in. high (the units don’t matter: 1.618 cm x 1 cm will work fine too but I’m using inches for this discussion). Leave the resolution field empty. Drag out your crop and accept it. Chances are you really don’t want an image that small. But wait — check the image size: Image>Image Size. Imagine that — it’s a small (1 x 1.618 in.) image at a high resolution! (1854.141ppi to be exact.) Make sure the “Resample Image” check box is not checked and set the resolution to 300 ppi. That’s it — you’re done! The resulting image is 10 inches wide by 6.18 inches high at 300ppi. Two steps instead of the marquee tool’s one step, but you gain the advantages of the masking, rotating and perspective control of the crop tool.
tiplet: You may have noticed a little button labeled “Front Image”. What is this all about? If you have an existing image that you need to match exactly, to the pixel, in dimensions and resolution, you can instantly set those parameters into the crop tool. Open the image that needs to be matched. Click the “Front Image” button. Photoshop takes that image’s dimensions and resolution and sets them into the crop tool. Now switch to another image and crop. The result will match the target image exactly.
final tiplet: the crop tool will happily crop outside the image! The bounding box can be dragged out larger than the image. Accepting this crop is roughly the same as selecting Image›Canvas Size, but you get to do it visually.
Straighten Up and Fly Right
 We have nearly reached the end of this epic journey. One stunning capability of the crop tool remains to be explored: the ability to apply a rotation as we crop. Photoshop does its best to provide the user with unambiguous feedback, and much of this feedback is in the form of custom cursors. If you have been observant as you have been messing around, you will have noticed that the cursor looks one way when you are over a control handle (the straight two–headed arrow), but it looks different when your mouse wanders outside the bounding box. This funny two–headed, angled cursor is the rotate cursor, which might quite possibly turn out to be the hand–held photographer’s best friend!
If your photographic specialty is fine art shots of moss colonies on ancient stone, this may not impact your life. If you shoot architectural or industrial subjects however, or if you are fortunate enough to live in a part of the world where the horizon forms a distinct line, you no doubt have a few images where lines which should be horizontal or vertical … aren’t quite!
This is definately one of those times when an animation is worth a bucket of words. I’ll try words first and follow with the animation. One way or the other, you’ll get the picture (so to speak).
Key to this whole technique is that funny little thing in the center of the bounding box. This is called the Registration Point. Now pay attention — the Registration Point can be moved! The rotation of the crop tool occurs around the Registration Point. Place that point where you wish the center of the rotation to occur. It’s so awkward to explain with words, but so simple to do.
Find a line in your image that should be vertical or horizontal. For the sake of clarity, I will hereafter refer to this line as the Reference Edge. Draw out a bounding box that originates at some point on that Reference Edge. (Size and shape of the bounding box doesn’t matter — we’ll adjust that later.) Drag the Registration Point to whatever corner of the Bounding Box intersects with that Reference Edge. Now, move the cursor outside the bounding box, and rotate the bounding box until one side aligns in parallel with the line you have selected to be a perpendicular (what I have been calling the Reference Edge). Note that, since the box now pivots around the Registration Point, it is easy to match the bounding Box angle to that of the Reference Edge.
Once the angle of the bounding box matches the angle of the Reference Edge, feel free to adjust the control handles of the bounding box, tugging them around to get whatever crop you wish. At this point, press enter/return with a suitable flourish and — voilá — amaze your colleagues with an image which has been both straightened and cropped in one stroke.
Assuming that you had as much trouble following this description as I had writing it, I submit the following animation. I hope that between the written description and the following visual you will grasp the power of this tool — capable of cropping, resizing AND rotating all in one go!

The Real World
I realize it may be difficult to make the leap from the abstraction of geometric shapes to the real life issues you will encounter. To that end, this tutorial concludes with a final example of an environmental portrait which I shot hand–held.
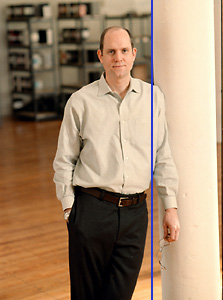
 There is a strong orientation element (the pillar) which should be straight but is not. (I added a blue line so you can see how off from vertical the pillar is.) On the left you see the initial scan; on the right you see it straightened and cropped. Below is a small animation demonstrating how I used the crop tool to accomplish this correction. (photo courtesy of Modernista!)
The pillar will supply what I call the Reference Edge. Drag out a bounding box, one corner of which touches the Reference Edge (size and shape of the bounding box does not matter at this point). Reposition the registration point to that corner. Rotate the bounding box so that one side lines up with the Reference Edge. Resize the bounding box to get the crop you want. Accept the crop however you prefer: press return/enter, double click inside the bounding box or (version 6 and 7 only) click the check mark icon in the option strip. It’s done in one step! (And remember - if you need to change the file’s resolution as well as crop crop it, that can be accomplished in the same one step.) Watch the animation play a few times until you catch on to what is happening. Then try it on your own images!

Conclusion
Whether you work in film or digital, chances are good at least some of your photos can be improved by judicious cropping. If your images wind up in a computer instead of an enlarger, Photoshop’s two powerful cropping options make the job easy and efficient.
The discussion so far has centered around improving the full sized image, but you might want to keep in mind how powerful what we might call “hard pruning” can be if you use small icons in a print piece or thumbnail images on a web page. Reducing the entire image to the size of your thumbnail will very likely turn it into an illegible blob of color. Consider abstracting a particularly interesting portion of the entire image to represent it. In many cases this will make the thumbnail or icon far more intriguing and compelling than a tiny representation of the entire image. Take a look at one of GurusNetwork member DL-44’s portfolio pages to see this put into practice extremely effectively.
Please keep in mind that I’m not Deke McClelland, or Ben Willmore. I don’t teach Photoshop for a living — I use Photoshop for a living. If you have a favorite cropping technique that I have overlooked, send me an email and let me know about it.
--top--