Additional information on “lighting” technique
Although I have done some interpreting, this unique method for adding highlights and shading was described by Jack Davis and Linnea Dayton in their Photoshop WOW series of books.
 Assuming you already have an alpha channel containing your “shape” (white on black), you will need to add one channel and two layers to your file. Duplicate the existing alpha channel, and blur this new duplicate. The amount of blur will depend on the resolution of the file, but for the low resolution images we are describing try a blur of 8 – 12, Gaussian. Load the un–blurred channel, inverse the selection and fill with black. (Careful — I want you to inverse the selection, NOT invert the tones.) Name the new channel something like “bump”, as it will be the height map for the Lighting Effects filter.
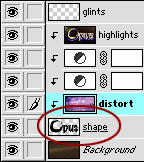 Add a new layer just below the distorted layer. Load the unblurred channel as a selection, fill with black and name it “shape”. Clip the distorted layer to this shape layer. Apply your choice of layer effects to the “shape” layer - try a soft drop shadow, and inner bevel and perhaps an outer glow set to multiply using a dark color from the image. This is starting to look good!
 Add a new layer above the distorted layer and be sure it is part of the clipping group. Name this layer “highlights” and set its blend mode to Overlay. Fill this layer with white. This step makes your image look pretty awful, but wait… there’s more! Filter>Render>Lighting Effects.
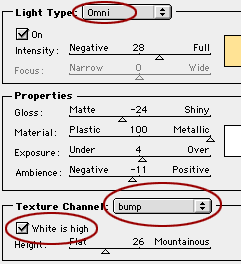 With the “bump” channel selected as the height map, and with “white is high” checked, set several Omni lights around the perimeter of the shape to establish some edge highlighting. By “several” I mean 4 – 6 lights. Their intensities and properties are subject to your own judgement. If the lights are colored subtly (warm above, cool below), the sense of the metal reflecting sky and earth can be heightened. As a final, optional step, Filter>Artistic>Plastic Wrap can be added to this layer for greater highlight complexity.
The final layer could look something like this. When set to Overlay the highlight magic happens.