Flash MX MP3 player, Pt.1
source: http://www.thegoldenmean.com
7 — The Volume Control
In contrast to all the scripting we have done, making the volume control slider will seem simple!
The Slider Clip
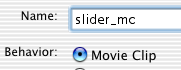 Press control F8 (command F8 on a Mac) to create a new MovieClip. Give it a name in the dialog that appears. Something like “slider_mc”.
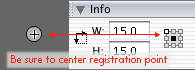 Select the circle tool from Flash’s tool palette, choose a stroke and fill color and draw a small circle. By “small” I mean something like 10–15 pixels in diameter. The critical thing is it must be centered on the registration point. One small enhancement is to make the fill 50% opaque. I find it kind of cool to be able to see the slider bar (which we’ll make in the next step) show through. Suit yourself.
Does it have to be a circle? Of course not. The player I’m building here is pretty minimalistic. Feel free to make your slider a square or a triangle or any other shape that suits the design of your own site.
Volume Control Module
Press control F8 (Command F8 on a Mac) again and name this new MovieClip something like “volume_mc”. Select the line tool and draw a 200 pixel line that starts at the registration point. If you like, you can embellish this line with tick marks at the half and quarter and end points. Or you can just leave it a simple line.
Create a new layer in this MovieClip. Drag an instance of the slider_mc clip from the library and give it an instance name in the Properties palette. To keep things simple, I gave it the same name as the library symbol: “slider_mc” (as before, the “_mc” suffix will trigger Flash MX’s code hinting).
Select the slider_mc instance. Move to the Properties palette and set its _x value to 100 and its _y value to 0 (zero). The slider should now be in the middle of the line.
Add Volume Module to Movie
Return to the main timeline. Click in the first frame of layer 2 (“UI Controls”). Drag an instance of the “volume_mc” symbol from the library and position it on stage somewhere beneath the two text fields which were created way back on page two. Be sure to name this instance. As before, I named mine the same as the library symbol: “volume_mc”. It is critically important to name your instance because we are about to call it by name in code.
The Volume Control’s ActionScript
Click in the first frame of layer 6 (“button code”) and open the ActionScript editor window. The code we are about to write could be written on the timeline of the volume_mc clip itself but I try whenever practical to keep all the code I can on the main timeline of the movie. Trying to track down code sprinkled all over the place can be a nightmare. Keeping it all “up front” makes it MUCH easier to find.
The Sound class has a number of useful properties and methods. We are going to be dealing with its volume property and using the setter method “setVolume()”.
Note: There seems to be a bit of confusion regarding setVolume(). According to the ActionScript reference in my copy of the program, the values permissable are 0 to 100 with 0 (zero) being the minimum and 100 being the maximum volume. According to Colin Moock, there evidently is no predefined maximum. He simply says sound volumes in the range of 100–200 are “generally quite loud.” I can report that there is a detectable change in volume between values ranging from 100 to 200, so it appears 100 is not in fact a ceiling. However, j-man feels that although sounds do get louder past 100 they are subject to clipping and therefore advises using 100 as a practical limit. This tutorial accordingly will limit the range to between 0 and 100.
We can use the _x position of the slider_mc clip to set and change the volume. We’ll make our scale range from 0 to 200 because it looks good, but we will divide that number by 2 for the actual volume. And we will use Math.floor to get integer values.
We get slider_mc to slide by calling the startDrag() method of the MovieClip object. But When should that behavior occur? When we press the mouse over the slider. So we nest the startDrag method inside an onPress event handler as follows:
//code for volume slider
volume_mc.slider_mc.onPress = function() {
     this.startDrag(false, 0, this._y, 200, this._y);
}
The first argument for the startDrag method (“false” in this case) is whether or not to snap to the mouse. The following four are the constraints within which it is permitted to move. We want to limit its horizontal movement to between 0 and 200, and not let it move vertically at all. Note that the units are relative to the volume_mc’s registration point, not the main movie’s registration point.
We naturally want the dragging to stop when the user lets go of the mouse, so we define an onRelease event handler:
volume_mc.slider_mc.onRelease = function(){
     this.stopDrag();
}
Good. Now the little circle moves back and forth along the track when dragged. How does this help with the volume control? The movie’s main timeline has been stopped. There is nothing currently running which would watch for changes in the position of the slider and update the volume of myTunes. The perfect mechanism for this is an onEnterFrame event handler, but it would be an inefficient use of resources to keep it going continuously. Let’s just create one when we need it and eliminate it when it is no longer needed.
Accordingly, we will modify the onPress and onRelease event handlers for the slider this way:
//code for volume slider
volume_mc.slider_mc.onPress = function() {
     this.startDrag(false, 0, this._y, 200, this._y);
     this.onEnterFrame = function() {
          myTunes.setVolume(Math.floor(this._x/2));
     }
}

volume_mc.slider_mc.onRelease = function(){
     this.stopDrag();
     delete this.onEnterFrame;
}
Conclusion… Almost!
And that concludes the construction of the basic MP3 player. It may be somewhat spartan, but you now have a flexible module that will play back any external MP3 files you care to throw at it and, best of all, will update itself when you modify the xml file. I hope you have learned some useful things along the way about the Sound class and the ListBox component.
If you care to continue, the remainder of this tutorial covers creating a button that will select the next item in your play list, a button that will select the previous item in your play list, a nifty button that toggles between play and pause modes and a selector that will instruct your player to automatically load the next song on the list when one track finishes playing. Page Eight deals with the play/pause button.
--top--