displace
source: http://www.thegoldenmean.com
Displace Filter, Page 3 - the Interface
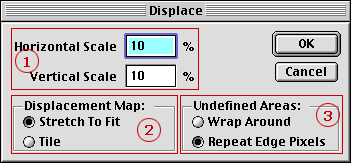
Not a lot to it, is there? The power comes from a perfect combination of a carefully, deliberately constructed DMap and appropriate settings in the interface.
I’ve divided the settings into the three main elements.
- Scale: Note that you do not need to accept identical vertical and horizontal amounts. Most of the time it is convenient to do so, but if you choose to have the displacement occur primarily on the vertical or horizontal axis, this is a fast way to do it. The scale determines the actual distance the pixels move. Were the percentage to be set to 100%, pixels would be moved the exact value of the DMap brightness — a brightness value of 100 in the DMap would Displace a pixel in the image literally 28 pixels (since 128 produces no movement). That’s obviously extreme for low resolution files. A setting of 5–15 percent does it most of the time for screen resolution files (unless your intention is for a gross distortion as we will see later in the glass and chrome section). But when working at high (print) resolution it is critical to be able to scale the displacement appropriately. Trial and error here — there’s no visual feedback. If you don’t like it, undo and reapply with different settings. To give you an example, I set the Scale to 15 percent in the tiny examples on the previous page.
- Stretch To Fit versus Tile. We haven’t gotten there yet, but the DMap does not have to match the Image File in either dimensions or proportion. This portion of the dialog box deals with how to handle a size mismatch — specifically, what to do with a DMap that is smaller than the image file. One option is to resize the DMap so it does match the Image (that’s “Stretch To Fit”). The other option is to let it Tile. We’ll see this in action on page Four. If the DMap matches the image size there will be no difference between “Tile” and “Stretch”.
- Undefined Areas. It’s not hard to image that if the degree of displacement is large or if the DMap extends close to the edge of the Image, pixels may get pushed right off the edge! What do we do with them? With Wrap selected, pixels that get pushed off the edge come right back from the other side! With Repeat Edge Pixels selected Photoshop will fill in the vacated areas with whatever tonality the image boundary contained. Because the simple examples on the previous page kept the displacement contained within the image boundaries and no pixels got pushed “over the edge”, either setting in this area of the dialog would have looked the same.
On to page four: Working with Tiling DMaps
--top--