extractions
source: http://www.thegoldenmean.com
Isolate Fine Detail and Replace a Background
originally written for the GurusNetwork.com
 Putting a subject in a new environment (replacing a background) is one of the more common retouching requests. It is also one of the most difficult and time consuming if soft edges are involved - meaning hair in most cases. It’s even worse when the old background isn’t simply a solid color or tone. The consuming public is increasingly under the impression that anything can be done, easily and with the click of a button, so chances are you’ll need to do this sometime, probably sooner rather than later!
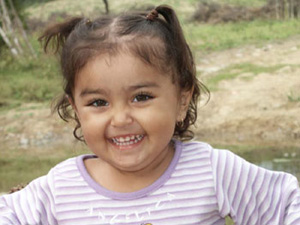
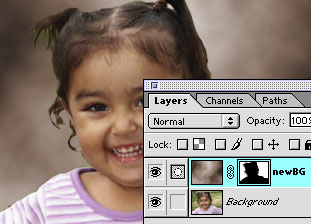
We start here. This photo of a charming young model was graciously provided by a member of the GurusNetwork Forum, Roberto Ayala. The beaming young lady is his 2 year old daughter, Cinthia Yesenia. If you were asked to place this young lady on a new background, you see the problems, right? Strands of hair and an original background that varies widely in tonal value and color.
Photoshop offers a wealth of tools and techniques for dealing with just about any situation, but sometimes it’s hard to figure out how to approach a given retouching task. This short demonstration is simply one method out of the many available. I found it worked well for this specific image. This is not the only way to do things! The Extract tool might come to mind as a perfect choice. However, my experience with the Extract tool has been that the tool is very frustrating if you don't have considerable experience.
Nope. We're going to start where you should always start when you need to make a mask - try to find some way to make the image do the work for you! The exact particulars of this demonstration will probably not work when you get asked to do this yourself, but the strategy will - look inside the image for the material.
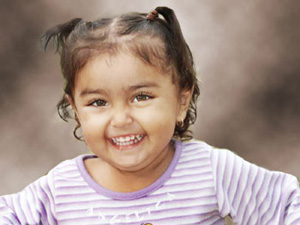 This is where we will end up. If you have never tried, please believe me when I tell you that making an effective selection from a complex shape such as this is nearly impossible by hand. We need to look for the selection hiding inside the image itself.
Where are we going to find that? In one of the color channels if we’re lucky. Switch to the channels palette and look for the channel that provides the most separation. There’s not a whole lot of difference between the three channels, but to me the green channel offers the best starting point. What's the theory here? Well, your image is in color. Your channels represent the color content, split up among the additive primaries. Something that is green will be very light in the green channel (a lot of green), while something red will be very dark in the green channel (very little green). You need to look for the channel in which the color distribution somehow isolates the “subject area” from the “not—subject area”
Because the channels behave this way, one potent strategy for finding effective raw mask material is to explore other color spaces, particularly CMYK. Duplicate the image and convert the duplicate to CMYK. Check out the channels in the new file and see if any of them offer better contrast than what you have. Cyan can be very different from blue or green. Magenta can be very different from red or blue. In this case I wound up staying with the Green channel from the RGB original, but many times looking for mask material in other color spaces has proven to be a real magic bullet for me.
You will find this a useful strategy time and time again. When you need to select a complex subject, look within the image first; consider the channels individually before you even think about the Lasso or the Magic Wand!!
 Now we have found a channel to derive our mask from, but it’s nowhere close to useable as it is. We have to magnify the difference between subject and not—subject (background); we begin this process by duplicating the green channel. We want to wind up with an alpha channel in which the area where the subject is becomes black, the area that will be background becomes white, and the delicate transition boundary is somewhat gray.
 Since the child’s shirt is going to get lost in any lightening move, I took the precaution of making a loose selection with the lasso and filling with black before anything else.
 Now — the parts that are light in the background need to be moved to white. I suppose you could go straight to curves or levels, but I took another step first. I used "Apply Image", set to screen mode. That means I blended the new alpha channel with itself in a mode which made the lights lighter without affecting the darks. I had to do it twice to get the degree of lightening I wanted.
Shown here is the result of one application of Apply Image:
Next, make another loose selection around the background area and fill with white.
 Afterwards, a shot of levels knocks the tones pretty close to black and white. However, there are chunks where levels has reached too far into the subject.
 Do a little hand work with a brush getting the areas that levels wiped out. Now the mask is looking coarse and abrupt; apply a slight gaussian blur (maybe 1 — 2), and again apply levels to tighten up the mask’s edges.
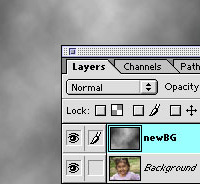 That’s it for the mask for the time being. Time to switch back to the layers palette. Create a new layer above the background. The new background will go here. If you plan to use a different photo, place it here. In my case I cooked one up from scratch with the clouds filter. Yes, it seems odd to put the background above the subject, but you will soon see why this is flexible.
 It looked too neutral to me so I made a hue/saturation adjustment to give it some warmth.
 With the replacement background layer active, load the mask alpha channel as a selection, whichever way you like. I activated the channels palette and command/control clicked the mask channel’s icon. Back to the layers palette. Click the “add layer mask” tile at the bottom of the palette to turn the selection into a layer mask. Bingo. The mask won’t be perfect. Finish it off by hand with the airbrush tool set to a low opacity (really low - like 10% for starters).
Paint with white on the layer mask to cover the subject and reveal the new background; paint with black to reveal the subject and hide the new background.
As a finesse step, I used the sponge tool set to desaturate to tone down the green color from the old background where it clung to the outer fringes of the hair. Maybe this is cheating, but you do what you need to do!
This would also be a good place to promote a unique technique developed by Gurusnetwork associate Warjournal for hiding any remaining halo of the background. In “quickmask mode”, paint a soft selection around the outside of the hair with a heavily feathered airbrush. Return to normal mode and knock down any lingering light fringe by using the curves tool, dropping the highlight end of the curve and maybe even introducing a slight color adjustment to make the halo fringe fit the new environment better. The technique is developed in greater detail at Warjournal’s “tech-slop” site. The particular page dealing with this clever technique for reducing a halo of carry-over color is the page called “whispies”. All sorts of possibilities exist in the fine tune stage. Believe me!
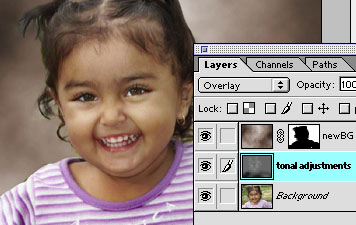 All that remains now is to make any final adjustments to the image itself. I added another layer set to overlay blend mode between the two layers. Set the airbrush tool to a low opacity (5—10%), and paint white where you wish to lighten the subject, black where you wish to darken and add contrast. This is a very powerful retouching technique. Even if you ignore the rest of this tutorial, get to know the power of the Overlay retouching layer!!
Save this layered version, just in case you feel the urge to change the background again! Save a flattened copy too.
As I said at the beginning, this is not the only way to isolate a subject from its background; it may not even be the best way, but it worked well for me on this image. The key to most isolation techniques is finding an existing color channel with quality raw material (enough tonal separation) to make a layer mask from. Once the source channel has been found and the contrast enhanced, this is used as the layer mask, which can be finessed and fiddled with to your heart’s content and no pixels are removed. You will find this strategy, or some variant of it, to be useful time and again. If you are asked to do this at work some day, look at the channels before panic sets in!
There are other approaches, some more destructive than others, that you might wish to experiment with, and I’ll just touch on them to get your brain mulling over the possibilities. Though they are both very powerful and capable, I would classify the Extract Tool and the Background Eraser tool as destructive because they actually remove pixels. The background Eraser (a very handy tool to know about) is one of the options in the Eraser tile of the tool bar. With this tool selected, place the cross hair just outside of the area you wish to keep; click and drag. The eraser will delete pixels which match the color of the first pixel you clicked on. Release the mouse and click again to select a new color to erase. Use a small brush for hard–edged transitions and a larger, softer brush for softer transitional areas. If there is strong color contrast between the background and subject this can be very effective. The Extract tool opens your image in an odd looking interface. You outline the transition area between subject and background, and the tool tries its best to keep what you want and discard the rest. Again, if there is strong color distinction this can be very effective. I’d like this tool better if it created a layer mask but it deletes pixels instead, making it tricky to fine tune afterwards.
Of course, you could reach for the tool most beginners go for, the Magic Wand, but I’d advise against that for this image unless you have way too much time on your hands. You could enter QuickMask mode and paint the mask by hand, whacking away at the broad areas with the lasso and getting the detail with a brush before turning it into a layer mask; or you could create the layer mask first and then do similar things. All of those approaches, or various hybrid acts of desperation somewhere between are certainly possible, and rare is the professional retoucher who hasn’t taken desperate measures when nothing else worked! But, and I say this once again for emphasis, the very first thing you should do when determining a retouching strategy is look inside the image itself — look at the channels for help before touching a wand or a brush or a lasso. You will save yourself loads of time and wind up with a superior product more often than not.
A layered psd file can be downloaded here It's big though - 2.1 MB.
--top--