the pen
source: http://www.thegoldenmean.com
The Photoshop Pen Tool - page 3
USING THE TOOLS
I’m going to attempt to use some analogies in this article. A path consists of anchor points and line segments. There are four basic types of anchor points. Different sources use different terminology, so it can get confusing. The terms I will be using are: corner, smooth, cusp and a corner/smooth hybrid. (I am also going to use the term “point” for the more correct “anchor point”. Forgive me.) There are two main types of line segments: straight and curved. For the moment, try to imagine a springy wire. A guitar string will do. Unlike a piece of rope, a guitar string’s material has a “memory”; it is made in such a way that it “remembers” what it is supposed to be. In the case of a guitar string, that is a straight line. That doesn’t mean it can’t be deformed, but it wants to be a straight line.
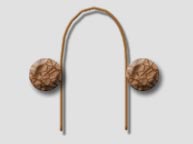 Imagine now that we have a board with two nails hammered in, and we force the springy wire or guitar string between those nails. It will form a smooth arc, right? The outward tension the string creates (wanting to be a straight line) will create a smooth curve. If we feed more string in, the curve expands in size but stays smooth. Without the nails, the string forms a straight line. The somewhat odd graphic at right is my attempt at clarifying this concept visually!
This is the best bezier curve analogy I can come up with. The Pen Tool creates points (the “nails” in the analogy) which constrain and define the segments, which can be either smooth curves or straight sections.
Time to move to Photoshop. The best way to understand the Pen Tool is to see it in action. This is going to result in a very busy page here, but try to read the words and not to be too distracted by the animations! Understand that what you see as you use the Pen Tool is a non–printing representation of the path. The path itself really has no substance unless you do something with it — stroke it, or make it into a selection and fill or some such thing. But of course in order to create the path, you need to see something, so Photoshop displays an indication of the points, the bezier curve handles and the segments themselves.
![]()
![]() The first thing we are going to do to make things easy for ourselves is to make sure the “rubber band” option is selected. This check box is located in the tool options palette in Photoshop 5.x (left illustration) and in the tool strip in Photoshop 6 (right illustration).
The first thing we are going to do to make things easy for ourselves is to make sure the “rubber band” option is selected. This check box is located in the tool options palette in Photoshop 5.x (left illustration) and in the tool strip in Photoshop 6 (right illustration).
Photoshop 7 “hides” this feature in a drop down sub-feature:
![]() You should also be certain to have the “Work Path Button” selected in Photoshop 6. The other option here will create a new shape layer and cause no end of confusion for you!
You should also be certain to have the “Work Path Button” selected in Photoshop 6. The other option here will create a new shape layer and cause no end of confusion for you!
![]() In Photoshop 7 that setting is located here. Make sure you inform Photoshop that you wish to draw a Path, not a Shape, or you will get VERY confused as this tutorial continues!
In Photoshop 7 that setting is located here. Make sure you inform Photoshop that you wish to draw a Path, not a Shape, or you will get VERY confused as this tutorial continues!
 So let’s create some points and make a path! With the Pen Tool selected, each click will place a “Corner Point”. Two corner points define a straight line. A corner point has no handles. With the rubber band option selected, Photoshop previews the path segment before the point is created, allowing you to put them down pretty close to where you want them to be. As with most Photoshop tools, holding down the shift key constrains the tool’s behavior to angles which are multiples of 45°.
Note that this illustration shows a closed path — the last point meets the first point. A path does not need to be closed, but if you plan to make a selection from the path it should be closed. Note that sometimes a point appears solid, sometimes hollow. An active (selected) point is displayed as solid; a hollow point is inactive (deselected).
 If you happened to have the Paths Palette visible while doing this, you may have noticed Photoshop automatically established something new — what is called a “Work Path”. This is a temporary item. It will be important later to know how to save a path permanently, but for now it’s enough to know that the first click of the Pen Tool creates a new work path; unlike creating new layers or channels, Photoshop recognizes automatically that you have made a path, and stores that information in a temporary Work Path.
 Handles, handles. I keep referring to handles. What are they? In this example we create what are called “Smooth Points”. A smooth point is created by clicking and dragging with the Pen Tool. As you drag, the handles are pulled out like stretching toffee. A Smooth Point is defined as a point which possesses two symmetrical handles. They mirror each other in length, and are 180° opposite from one another. The distance and direction of the drag defines the shape of the curve, and again the rubber band preview is an invaluable aid in anticipating the curve as you draw it, before actually placing the point.
There is a third type of point - the “Cusp Point”. This differs from a smooth point mainly because its two handles are not symmetrical. Note that one handle can be stretched and/or angled without the other one moving. This is a very useful tool for me, as often times the thing I am outlining with the Pen Tool has graceful compound curves that flow in different directions. We will see an illustration later of a wine bottle. The neck and shoulder of the bottle is a smooth, sensuous shape made up of curves that change direction smoothly. This cusp point makes it possible. The only way to create a cusp point is with the Convert Point tool (shortcut is alt/option key). Drag on a corner point with the Convert Point tool to pull out a new handle where there had been none. Drag on a Smooth Point with the tool to draw out a new, independent handle replacing the existing handle (right illustration below); or drag on a Smooth Point control handle to reshape it (left illustration below). Since the handle's length and direction determines the shape and size of the curve, the ability to adjust each handle separately give remarkable control. Once a point has been changed to a Cusp Point, the handles remain independent and can be manipulated individually with the Selection Arrow.


I guess I should point out that an anchor point must be selected for the handles to be visible. If you are coming back to adjust an inactive point, use the shortcut to get the selection arrow (command/control) and click on the point. The hollow square becomes solid and the handles associated with the point spring into view. Let me say this once again so it will sink in. An existing smooth point can be converted to a cusp by first selecting it (shortcut: command/control click on the point) and then dragging one of the handles with the convert point tool (shortcut: alt/option). A cusp point can be created on the fly by clicking and dragging with the Pen Tool (the same as creating a smooth point) and then placing the Pen Tool over the just created point, holding down alt/option to get the Convert Point Tool and dragging out a new handle in whatever new length and/or direction is required.
Finally we see the hybrid corner to curve. This is a point with only one handle. A click creates a corner point. Place the cursor over the corner point and alt/option drag out a single handle (remember, alt/option temporarily changes the Pen Tool to the Convert Point tool). This handle can be stretched and angled like any other handle, and we can achieve a fluid curve segment coming from a straight line.
Two more micro-tips: Click on a smooth point with the Convert Point tool to turn it into a Corner Point with no handles. Pull one handle of a Smooth Point all the way back to the point itself with the Convert Point tool to make it into a corner/curve hybrid point.
Note the second illustration here. When you make a closed path inside of a closed path, it becomes a “compound path” — effectively a shape with a hole inside it!


 Do you remember that I said the most important thing to success with the Pen Tool was Practice? Believe it. It’s a feeling thing. How far to drag, which direction … it comes with experience. One tip though — try to determine where the curve changes direction or character, and place the next point there. This may sound obscure right now, but it will come to make sense. Strive for elegant simplicity, using as few points as necessary. The tendency to put a point at the top of an arc, because it appears the line changes direction, but that’s often an unnecessary point and makes for choppy paths. A “U” shaped curve only needs two points - one at the beginning, one at the end. Imagine the shape an “S” makes. Starting from the top, it goes from east to west, makes a “U turn” heading east again, and then reverses direction once more. Where on this shape would the points be placed? Where the curve changes direction. This is a critical concept. Please keep it in mind as you begin learning to control the Pen Tool - you will make progress much faster if you understand this key concept. It still takes lots of practice, but you’ll be ahead of the game if you know what you are aiming for! Place the fewest points necessary, and place them where the curve or line needs to change direction.
 This page ends with one final illustration. The ability to tweak and finesse the path is the Pen Tool’s ultimate advantage. The selection arrow (control/command) can select a point and move it anywhere (drag a marquee around multiple points to select more than one at a time). The same selection arrow can grab a handle and adjust the shape of the curve. Finally, the same selection arrow can be used to directly manipulate the segment itself! Note how the handles move in response to manipulating the segment. You can sense my hand moving the mouse and the feedback loop as I decide where and how far to move it.
That's the crux of the astonishing, flexible Pen Tool. If you would like, please feel free to download some simple practice samples here. With the basics out of the way, let’s move to page four where we use it in a real situation, save the path and make it a clipping path.
--top--