dodge & burn
source: http://www.thegoldenmean.com
Dodge and Burn Tone Tools
originally written for the GurusNetwork.com
![]()
![]() The Dodge and Burn tools in Photoshop provide local tonal control for photos and other graphic images. This article discusses when to use these tools and how to use them. Some examples of practical applications will be provided and finally an alternative offering even more control will be demonstrated.
The Dodge and Burn tools in Photoshop provide local tonal control for photos and other graphic images. This article discusses when to use these tools and how to use them. Some examples of practical applications will be provided and finally an alternative offering even more control will be demonstrated.
Putting the “Photo” in Photoshop.
First off — what’s up with those odd icons? You have to have experienced work in a conventional (wet) photographic darkroom to understand and appreciate the metaphor Adobe used for these tools. We need to make a digression into photography’s tradition before moving on to Photoshop. Experienced photographers, please be patient through this background information.
Conventional photographic printing (excluding direct positive materials such as Cibachrome) is a reversal process. After development, the film is called a “negative” because the tones have been reversed: shadows look light and highlights look dark. In the printing darkroom, a light source in an enlarger shines through the film negative and is focused onto a sheet of sensitized paper. Once developed, the paper turns light or dark in proportion to how much light falls on it. The more light that strikes the paper the darker that area in the final print. What is light (clear) on a negative passes more light, so that becomes dark in the print. What is dark (opaque) in the negative passes less light, so that becomes a light area in the print.
The over all lightness or darkness of the print can be controlled by the amount of light that strikes the paper. This is controlled by the duration of the exposure and the enlarger lens aperture. If the first print is too dark, give the next one less exposure and vice versa. What if the over all exposure is generally acceptable, but parts of it are too dark or too light? The printer needs a mechanism for local control.
Shadow Figures
![]() Exposing the paper to light takes some time (5 seconds, 20 seconds, a minute - you have control of this with the enlarger lens’ aperture). During this time you have some ability to exert local control by holding back light that falls on the paper. This is done by putting something between the enlarger and the paper that casts a shadow (hands in different shapes, oddly shaped bits of cardboard stuck on a thin wire). By holding back light in select areas you make them lighter than they would have been. This is called “dodging”. Does that icon make sense now?
Exposing the paper to light takes some time (5 seconds, 20 seconds, a minute - you have control of this with the enlarger lens’ aperture). During this time you have some ability to exert local control by holding back light that falls on the paper. This is done by putting something between the enlarger and the paper that casts a shadow (hands in different shapes, oddly shaped bits of cardboard stuck on a thin wire). By holding back light in select areas you make them lighter than they would have been. This is called “dodging”. Does that icon make sense now?
![]() After the base exposure, you can add more light to selected areas by turning the enlarger back on and, while shielding everything else, allow additional light to fall on selected areas. Again — combinations of your fingers, hands or sheets of cardboard with holes cut in it are used for this. Printers call making selected areas darker by adding more light to them after the main exposure “burning”. Now hopefully that icon makes sense to you!
After the base exposure, you can add more light to selected areas by turning the enlarger back on and, while shielding everything else, allow additional light to fall on selected areas. Again — combinations of your fingers, hands or sheets of cardboard with holes cut in it are used for this. Printers call making selected areas darker by adding more light to them after the main exposure “burning”. Now hopefully that icon makes sense to you!
On to Pixels
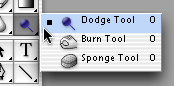 Photoshop’s three tone controls live in the same spot in the toolbox. They are the Dodge tool, the Burn tool and the Sponge tool (which won’t be covered here). I have called your attention to the “o” in the name of two out of the three tools, because that’s the mnemonic device to help you remember the keyboard shortcut. Press the “o” key and Photoshop selects the last tone tool you used. If that’s not the tool you want, press shift + o to cycle through the tone tools.
Settings:
As with most things computer, you get features and control we never had in the darkroom. For one thing, you don't have to choreograph a complex little finger dance into a fixed amount of time (we got pretty good at counting seconds in our head, and keeping track of what to do where for how long: minus 2 second top right, minus 2 second face, plus 5 seconds left edge, etc.). You also have controls which just wouldn’t be possible in a darkroom: Photoshop's dodge and burn tools can be biased to produce greater effect in shadows, mid tones or highlights! Wow. The settings are pretty self–evident once you know they are there, but let’s take a quick look at them.
![]()
 The user interface changed radically between version 5.x and version 6/7, so here are screen captures from both versions. After selecting either the dodge or burn tool, you need to tell it whether to effect primarily the darker tones, the lighter tones or the mid tones. You also have control over the strength of the effect. And to cap it all off, you can apply the tool with your choice of any brush size, shape or hardness.
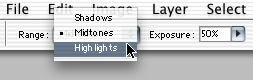 [Select the range you wish the tool to affect most strongly.]
So, what’s it good for?
It should be reasonably obvious when to use the tools, though I do caution restraint. If you find yourself dodging and burning all over the place, maybe the image should have had better global correction first. With what you know about the fine points of controlling these two tone tools, you can use them with considerable subtlety.
Now a confession on my part. I almost never use the burn tool, and I rarely use the dodge tool for tone control. My preferred technique for that is coming up shortly. Having said that though, there are times when the dodge tool is an enormous help to my work as a photographer.
We are often asked to photograph things or people on a white background, so the image can be placed on a white page. The client doesn’t want a light background — they want a white background! Often it is just plain impossible to get a pure white background without ruining the subject matter. Imagine a white shoe, or a shiny metal part. You just can’t photograph subjects like these on a pure white background; the photographer needs to light for the product and then deal with the background later.
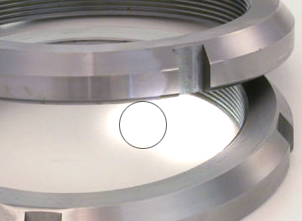
The dodge tool, set to “highlights” and applied with a large, soft brush, is often the fastest and easiest way to get the area immediately surrounding the product to white. After that it’s simple to grab the rest with the lasso and fill with white. Here are two examples:
[photo of lock nut courtesy JKMabry.]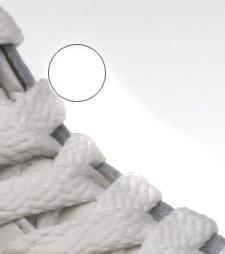
 It’s even easier when the subject is dark. Since we can’t always photograph three dimensional subjects without shadows, we often have to get rid of them later. Since the dodge tool can be set to ignore dark things you don’t even have to be that careful! Truly a useful tool for a photographer.
A better way?
Wow. We have tools that can be constrained to work only at specific tonal ranges, at almost infinitely adjustable strength and applied with brushes of any combination of parameters you can come up with. Could it get any better than this?
Well in fact, yes. There is a technique I use more often than the dodge and burn tools for local tonal adjustments because it is even more flexible and it’s reversible! For all the advantages offered by the dodge and burn tools, the one enormous disadvantage is that the effect is applied directly to image pixels. You don’t get too many opportunities to change your mind later in an editing session, much less days or weeks later. In the previous examples (dropping a background to white) I honestly don’t care about coming back later to tweak the effect, but the tonality within an image is a different story. I could very well want to come back an hour or a day or a week later and finesse the shading on a portrait or a landscape. I want all the flexibility I can get!
Overlay Advantages
![]() Create a new layer in “overlay” mode. The easiest way is to option click (alt click if you use a PC) on the New Layer icon at the bottom of the Layers palette.
Create a new layer in “overlay” mode. The easiest way is to option click (alt click if you use a PC) on the New Layer icon at the bottom of the Layers palette.
 In the dialog that will appear, choose “Overlay” from the popup menu, and check the option to fill it with 50% gray (the overlay "neutral" color.) Paint on this layer with all the controls the brush tool offers you. Paint with a gray lighter than 50% and it “dodges” — the closer to white the stronger the dodge effect; paint with a gray darker than 50% and it “burns” — the closer to black the stronger the burn effect. Don't like what you did? Paint with 50% and it erases the effect. Lower the opacity of the overlay layer to finesse your work. This is control like you wouldn't believe. Want to “burn” the edges so the viewer’s eyes are drawn into the image? Make a selection, feather it heavily, inverse the selection, fill with a darkish gray and fine tune to taste.
Limitations to the Digital Darkroom
Keep in mind an interesting difference between digital images and photographic negatives. You can sometimes open up the shadows more successfully with a digital image than with a film negative, but you can never burn down blown–out highlights in a digital capture or scan as well as we can when printing a negative — it’s one of the analog advantages. Negatives can contain quite a bit of information beyond what photographic printing paper can hold. Burning can sometimes bring out surprising, significant detail in what would otherwise appear featureless white.
If it's gone on a digital scan or capture — it’s just plain gone.
Film and paper have what is called a “characteristic curve” — there’s a more or less straight middle area in which exposure and density have a predictable relationship. Then there’s the toe (shadows) and the shoulder (highlights) where a change in exposure doesn’t make a linear density change. However, though it may not be linear, information can still be found in these areas. If it’s there it can sometimes be brought out.
Digital (at least from digital cameras) can be essentially linear throughout it's range and then — bang. Hit zero and anything darker is lost. Hit 255 and anything lighter is lost. Digital is therefore much closer to slide film than negative film.
Conclusion
Once you understand the traditional photographic metaphor Adobe employed, you can relate easily to the tone modification tools Photoshop offers. They are extremely useful and flexible tools. As we know by now, with Photoshop there is always another way. I hope the alternative Overlay technique will prove as versatile and useful to you as it is to me.
--top--