resolution
source: http://www.thegoldenmean.com
Understanding bitmapped graphic resolution
originally written for the GurusNetwork.com
![]() The innocent–sounding term “resolution” should mean something — really, it should. Unfortunately, it has devolved into a vague catch–all term for a lot of things and has in the process lost much of its specificity. We can’t educate the whole world into the proper terminology, but if we ourselves are clear on the concepts it will help us communicate with customers and vendors.
The innocent–sounding term “resolution” should mean something — really, it should. Unfortunately, it has devolved into a vague catch–all term for a lot of things and has in the process lost much of its specificity. We can’t educate the whole world into the proper terminology, but if we ourselves are clear on the concepts it will help us communicate with customers and vendors.
Definitions and Terminology
Let’s begin by defining two key terms, pixel dimensions and resolution.
- pixel dimensions
- All raster images have a fixed number of pixels that make up their width and height. This is the only fixed attribute they have, and this fixed pixel attribute doesn’t mean anything about reproduction dimensions until resolution is taken into account.
- resolution
-
Dan Margulis, one of the most lucid voices in the industry, attempted to define resolution as: “ how far apart the smallest distinct parts of the subject of discussion are”. For purposes of our discussion so far, the “smallest distinct parts” will be pixels. Thus, resolution for now may be considered to be the number of pixels per linear unit of measure. In the U. S., the standard unit of measure is the inch. If an image were to be defined as 150 pixels per inch (ppi), we would find that one inch contained 150 pixels.
(Please pardon my U. S.–centric use of inches. Feel free to substitute units you are more comfortable with. The concepts won’t be affected.)
If you were paying attention, you will have caught the crucial element to resolution: the somewhat arbitrary linear dimension. On their own, pixels don’t have a clue about 2 dimensional space. Pixels have no fixed size. Read that last sentence again and consider it’s implications. We combine pixel dimensions (how many actual pixels there are in a file) with resolution ( how many pixels fit in an inch) to determine the file’s output dimensions.
Dots? What dots?
You may also have noticed that the term “dots” hasn’t been used yet. If “resolution” as a term is misused and misunderstood, the ubiquitous “dpi” probably takes the award for most mis–applied pseudo–technical term in our field. The world at large will never learn the fine distinctions, but you should.
So just what’s so criminal about using the term dpi indiscriminantly? Consider for a moment just what parts of the process actually involve dots — almost nothing! Where are the “dots” in a digital file on your hard drive? Where are the “dots” in a scan? The only process that actually uses dots (offset printing) uses a different term altogether! Let’s consider what we as digital imagers work with, and what would be better (meaning more specific) terminology.
| scans: | samples per inch |
| digital raster images: | pixels per inch |
| monitors: | maybe dots per inch, or pixels per inch |
| offset printing: | a good case could be made for dots per inch, but ironically they more commonly use lines per inch - referring to the line screen ruling |
As I said, those of us who are careful to use language with precision will never prevail over the hordes of lazy or uninformed customers, vendors and even co–workers who find it more convenient to only learn one term, and to then use that one term to mean many things. Being clear in your own mind will be extremely helpful in the long run however, because time and again you will find yourself in the position of figuring out what these people really want!
A little red warning flag should pop up in your mind when someone tosses around the phrase “dpi”. An absolute emergency siren should go off in your brain when the term “high resolution” is uttered because, as we will soon see, this phrase — while seeming to mean something quite specific — actually means next to nothing at all.
The Fluidness of Dimension
A raw raster image on its own has no dimension. No physical dimension that is. It has pixel dimensions, it has an aspect ratio, it occupies a certain amount of disk space, but it has no physical dimensions. It’s completely fluid until it has been defined by resolution. When we refer to a file in terms of ppi or, less correctly as we have seen, dpi we are now talking about a collection of pixels that have been organized into finite physical dimensions.
A file’s pixel dimensions are fixed. Pixel dimensions and ppi (resolution) maintain a dynamic relationship. Given some quantity of pixels, if you set the resolution, the physical dimensions are established. On the other hand, for the same quantity of pixels, if you set the physical dimensions the resolution is the unavoidable result.
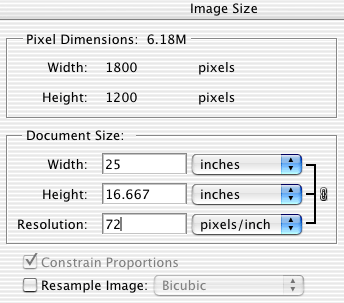
This relationship between pixel dimensions, resolution and physical size probably sounds like a bizarre concept. Let’s consider a real life example: we used to own a digital camera that produced a very respectable file size, but it defined that file at 72 ppi. In round numbers, the pixel dimensions were approximately 1,200x1,800 pixels. Defined at 72 ppi, that worked out to a really large image — something like 17x25 inches — almost poster sized! The problem was, no one wanted a 17x25x72 ppi image! This wasn’t the camera’s fault - it had no idea what a customer wanted. Changing the resolution from 72 ppi to 300 ppi without resampling the image made it a much more practical 4x6 inches. The key phrase in the preceeding sentence was “without resampling”. No pixels were added or subtracted, and thus the modified file was identical to the original except for how the pixels were defined.
1,200x1,800 pixels = 16.6x25 inches x72 ppi = 4x6 inches x 300 ppi.
 Photoshop just so happens to have a remarkably useful tool for demonstrating this relationship between physical dimensions, pixel dimensions and resolution: Image>Image Size. It’s also an extremely important tool for setting size and resolution too, but for the moment we will simply use it as a demonstration tool. They key here is to have the “Resample Image” check box un–checked. This will prevent any change to the actual pixels from occurring, which can be verified by consulting the File Size at the top of the dialog. (Do keep “Constrain Proportions” checked.) Note that a change to (physical) size results in a change of resolution, and a change of resolution results in a change of (physical) size. The total quantity of pixels remains identical. Watch this animation play through a few times until you grasp what is going on. Then open an image or two of your own in Photoshop and do some further study. It's amazing!
Let me say it once more: A bitmapped (raster) image file, out of the context of resolution, has no physical size. It’s fluid. Here’s one more illustration that helped me — you may find it useful too. I like to think of digital files as three dimensional objects. When we talk about a two dimensional shape, we can describe it’s area. Three dimensional objects need to be described in terms of volume. The area of a rectangle is calculated by multiplying length x width. The volume of a cube is calculated by multiplying length x width x height. I like to think of resolution as an image’s third dimension. Think of your pixels as a quantity of coffee. Confined by the walls of a mug, they occupy a footprint of a certain diameter on your desk — let’s say three inches. Now — who hasn’t done this — the telephone rings. You reach over to pick up the receiver and tip over the mug.
What happens? Coffee now covers half your desk.
Where did it come from? Is there more coffee now than there had been? Nope. It has just been defined differently. Instead of taking a fairly small part of your desk at some depth (“high resolution”), it now occupies a fairly large area at very shallow depth (“low resolution”).
1,200 x 1,800 in the mug is 4 x 6 x 300 ppi.
1,200 x 1,800 spilt is 17 x 25 x 72 ppi.
High vs. Low — Which is Better?
I think we can agree that coffee in a mug is good, while coffee spilt is bad. The same conclusion can not be reached with digital images unless resolution is mis–applied.
Although there is no general agreement as to what “high resolution” is, I think it is generally acknowledged that low resolution is in the 72–96 ppi range. A computer monitor is generally set to 72 - 96 ppi. A monitor can be (and should be) thought of as an output device. Think of how many images are created for the exclusive purpose of viewing on–screen and nowhere else. PowerPoint shows, video stills and of course Web pages are common examples. A monitor will typically map one image pixel to one monitor pixel (1:1 in other words). A monitor is a low resolution device and in order for the image to look right on–screen — low resolution is the right resolution! [Note that, because there are variations in monitor resolutions, Web graphics are often specified in pixel dimensions, in which case resolution doesn’t matter! An image measuring 15 pixels by 300 pixels will look the same in a Web browser regardless of whether it is set for 72 ppi, 300 ppi or 12 ppi! All the browser cares about is pixel dimensions. Do you understand why now?]
Why do the two platforms have different monitor resolutions? My understanding is that Apple’s Macintosh computer, introduced in 1984, was geared toward the print publishing industry, and conceived of as a true WYSIWYG environment. In print, type is specfied in “points”, and there are 72 points per inch. Thus, the Apple engineers developed high resolution monitors capable of displaying 72 pixels per literal inch. Each screen pixel was 1 point. Type set to 12 points took up the same space on screen as it did on paper. Computing systems prior to this, which never intended to provide WYSIWYG feed back on screen, used monitors which were in fact derived from television monitors which have larger screen pixels and are not capable of rendering detail that fine. Today, high resolution computer monitors are common, but the legacy default resolutions remain.
Print is a different matter. It gets a little less cut and dried. Offset printing (four–color or grayscale) uses dots of varying sizes placed at equal distances from each other in an orderly pattern. The distance from center to center of these dots (and also the size of the dots) is determined by the line screen (the spacing of the rows or lines of these dots) — lines per inch in the U.S. — and this in turn is determined by the medium, the paper stock and the press conditions to name a few of the variables. Newspapers are typically printed on crummy stock at tremendous speeds - the dots are quite coarse. Magazines and catalogs typically have somewhat better paper and printing conditions. Annual reports, art books and such often have exquisite paper and no–holds–barred printing conditions. The line screen for newsprint might be 60–85 dots per inch; art books might exceed 300 dots per inch. Because of how image setters work, the rule of thumb is a file resolution of 1.5 - 2 times the printing line screen. That means something around 90 – 150 ppi for newspapers, 250 – 300 ppi for magazines and 300+ for the high end stuff.
These are all just rules of thumb. Experience and a helpful printer can get you more specific information. Posters, for example, can often be printed at considerably lower resolutions than magazines, because the viewer isn't expected to be as close when they look at them.
[Please understand that this superficial coverage does the complexity of print an enormous injustice; it turns out that the resolution of the imagesetter is also a critical aspect of the print quality chain. For an exhaustive, authoritative exploration of the topic, I warmly encourage you to purchase Dan Margulis’ indispensable reference book “Professional Photoshop”, in it’s 4th glorious edition at the time of this writing.]
Inkjet Printers
Don’t be mislead by the stated resolution of desktop inkjet printers. The file does not need to be that resolution! The clearest statement I have read so far about the resolution requirements for inkjet printers has been published by Color Byte Software. Color Byte publishes a highly regarded software RIP for inkjet printers called ImagePrint; their site features a product tour which is a very valuable resource. I encourage you to read it if desktop ink jet printing is an area you wish to learn more about — even if you don’t intend to invest in ImagePrint. (“RIP” stands for “raster image processor”. It’ the bit of software that tells a printer where to place the spots of toner or ink, or image setter where to expose the spots that make up the dots on the plate.)
Determine the “Right” resolution
For Web pages, PowerPoint and video, the “right” resolution is 72 ppi. For print — the “right” resolution is a balance between file size and pixel data. Too little data and the image can look coarse and jagged. Too much and working with the file becomes difficult, archiving it is unnecessarily costly and the printed result can actually suffer.
Changing an Image’s Pixel Data
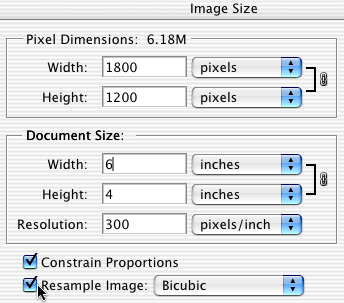 We have covered how to establish or modify an image’s resolution without changing the number of pixels — keep “Resample Image” unchecked. However, there will be times when you do want to end up with more or fewer pixels than the original file contained. In this case, select Image>Image Size and make sure “Resample Image” is checked. (You will almost always want to keep the “Constrain Proportions” check box checked.)
Making an image smaller (reducing the total number of pixels) is called downsampling. Let’s say you wish to use that 4 x 6 x 300 ppi image at that size on a Web page. Image>Image Size. Check the “Resample” box. Highlight the Resolution field, type “72”. Notice how the pixel dimensions and new file size instantly change. Click okay. Your image will shrink because it is now — smaller! Type command + option + zero (control + alt + zero on a PC) to display the newly resized image at 100%. Sharpen as necessary and choose “Save For Web”.
 It’s just as easy to make an image larger. Keep “Resample Image” checked and increase Resolution , Document Size or even Pixel Dimensions. Note the changes the dialog box displays, especially File Size. You do want to be careful with this. When Photoshop is asked to invent pixels, it makes an educated guess as to what color and brightness the new pixels should be based on what adjoining pixels are. Within reasonable limits this can be quite successful. Every image will have different “reasonable limits”, so you need to be the judge of what you can or can’t get away with, on a case–by–case basis. Note that the “Bicubic” interpolation method is generally considered to result in the highest quality for continuous tone images.
As you explore the Image Size dialog, note that the pop–up items in the lower section can contain units other than inches, and that those in the upper section offers percentage as well as pixels. This can be extremely useful if you need to reduce (or enlarge) the image by, let’s say hypothetically, 43%.
In conclusion …
The “best” resolution is the one that’s appropriate for your end result. Making a low resolution file from a high resolution file works better than the other way around, so if you know you want to produce a file for print, you should be working at high resolution (whatever that is) from the beginning. If your image is for the internet (or PowerPoint) only, start low and just stay there. If you know your image will be “repurposed” — favor high resolution. And in all cases and at all times, seek to use terms like dpi, ppi and high resolution precisely. The world will be a better place for it!
--top--